Thursday, January 30, 2014

Little bit of Scrapping

Recently I wrote that I feel reeeeally inadequate when it comes to scrapbooking.  I have tried to think of scrapbook pages as big overgrown cards LOL but I don't often feel satisfied with the pages I have created.  Well, you know what they say!? "practice, practice, practice"!! : ) 

I am working with a good friend of mine who owns a scrapbook store.  We are creating "page kits" to be sold at her store. In the kit we will provide a picture of the page and all of the elements needed to complete the page.  All her customers will need to do is supply the memories!


Here is a kit that I completed recently.  I'm liking it!!

I hope you have a great day in your part of the world! : ) We are gearing up for another snowfall and some dangerously cold weather so I expect to be staying in and enjoying some papercrafting time!

Thank you for looking : )

Patti

Supplies Used:
Valentine Paper by American Crafts "Love" series
Floral horizontal paper strip by Bo Bunny "Kitchen Spice Ginger"
Ribbon by American Crafts
Hearts die cut using Spellbinders

I am drawing for a FREE card on February 10th : ) See THIS POST for details

Wednesday, January 29, 2014

Let everything that has breath Praise the Lord!

This image reminds me of Psalms 150:6 : )

 Another outstanding image from Digi image from Mo's Digital Pencil.
 
I hope you have a wonderful day today!! : )

Patti

p.s. please be sure to check out my FREE card giveaway - see THIS POST for details!

Tuesday, January 28, 2014

Converse-SATIONAL! Birthday

Today I have a couple of goofy little cards I created.  But before I get to that I wanted to welcome two new followers:  Lorraine and Rose.  I have bee honored when people have welcomed me in this way and so I would like to adopt this practice as well!  Please go and visit the two great blogs and by all means!! Leave some LOVE : )
A long time ago I happened to see a shoe card on Pinterest similar to this and knew I wanted to create one too!!  I googled Converse shoes and found this shoe at Macy's
It was my inspiration! heehee It was actually not terribly hard.  I created a litttle pattern from scrap paper and then made two cards one for my GREAT! nephew, Zane and another for my card collection so that I have it for an "emergency" card in the future or just to entertain myself when I look at it : )
Converse All Star emblem created (badly) on the computer : p

Black cardstock with a white core scuffed up with sandpaper.


 Hope you are staying warm and inky in your part of the world!

Please view this post to learn how you could win a FREE card in my February 10th drawing

Thank you for looking : ) Have a GREAT day!!

Patti

Saturday, January 25, 2014

Seed Shooter

I set aside some crafting time today to finish up a few cards I've been hoping to submit for challenges.  This one I created for two challenges!. 

 The folks at House-Mouse and Friends have offered up a great challenge with HMFMC #161 The challenge was to use a stamp that has not been used before!  I only have a few stamps that qualified and this sweet little Hopper "Seed Shooter" was the one I picked to use for the challenge.


 I selected a background paper for my 5 x 5" square card that looks like a table cloth.  I cut all the way around the edges of both the "tablecloth" and the "napkin" and then sewed the trim on the sewing machine with a really close stitch : ) I also traced a very light and thin line from a glitter pen to accent the stitching. So my sweet little Hopper finally makes it's debut!

For the design of my card I used  sketch # 329  from MoJo Monday.  I thought this simple sketch would allow me to get that simple "down home" look I was after for my card.  Yet again! the Mojo Monday folks to the resuce!! : )

Please be sure to check out these two wonderful blogs and while you are there I hope you will "blurf" around a bit to see some of the creations others have made in answer to these two challenges.  If you do please leave some blog love!! we all love that blog love! : )

Hope you are having a great night!

Patti

What can you make for just over $21.00? (Part three)

This is the third and final post of some projects I created using ONE - Bo Bunny Paper and Embellishment pack I call "The Bundle".  If you want to check out post one click HERE  If you want to check out post two click HERE.

The final collection of designer papers Bo Buny included in "The Bundle" is called Mistletoe.  I had kind of a hard time with the last set mainly because I had run out of time for my challenge but also ... well I think i am weary of red and green and Christmas themed projects right now.  But!! I hope you'll agree "The Bundle" has a LOT to offer so far and "Mistletoe" does not disappoint!
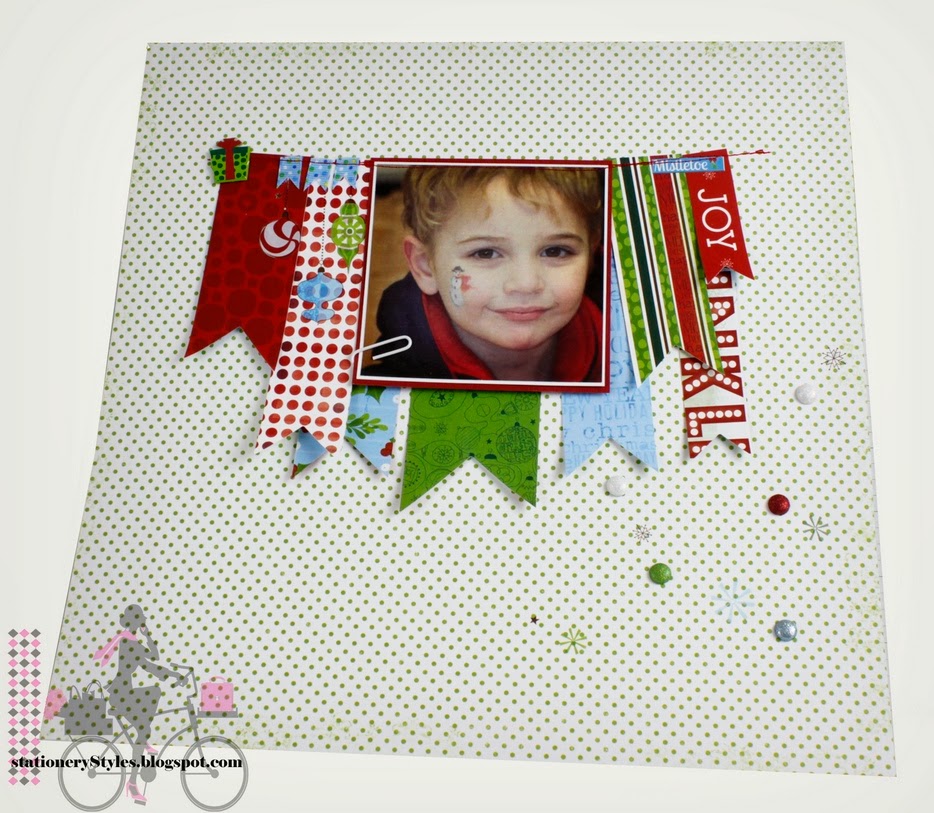
I selected several papers from the 12 x 12" cardstock included in"The Bundle" and cut them in varying length banners.  I attached them (and my darling grandson's picture) to the page by sewing them just at the top. That is the only way they are attached.  I used Washi tape to hold them in place while I ran the page through the sewing machine.  (I LOVE Washi tape! : ) it is both a nifty embellishment and a handy tool!)

The ornaments featured in the upper left are Rub-Ons as are the snowflakes scattered around the lower right side of the page.  The rest of the embies are brads from "The bundle" The only elements not form "The Bundle" are the teeny little ribbon banners sewn to the upper left and the plain old paper clip. : )


 Here is a 12 x 12" page I created using the elements from "The Bundle" are you sick of me saying that yet LOL I'm giggling every time I write it. 

OK, so as I mentioned I am very intimidated by Scrapbook Pages in general because I have done so few of them.  While I was laboring over how to tackle the task at hand I got to thinking.... I get my "Mojo" from great sketch sites like Mojo Monday so why not  see if I could get some sketch help for scrapbook pages too.  Sure enough! there are oodles of "Sketches" on-line. The results are that I have become MORE intimidated.  I was really impressed with the detail and art that goes into many peoples scrapbook pages.  But I have decided to stick to cards after this! Scrapbook pages are way out of my league!!

I embossed the white strip of paper with the Snowflake Cuttlebug folder.  My "Title" Fa La la la la la" is a sticker from.... you know! as are the sweet little brads.  The "journaling" tag was printed on my computer. The little present on the photo section is a Rub-On. : )
This A-2 sized "Countdown to Christmas" card was fun to make.  I embossed the paper with the numbers printed on it with a Numbers Cuttlebug embossing folder. I also added two little brads in the lower left corner - one says 12 the other 25.  "It's beginning to look a lot like Christmas" sentiment is a sticker.

I only created two cards with this paper series because I figured my friend, Barb's, customers might feel like I do about Christmas cards but I also acknowledged that many of them may be putting their Christmas memory books together - that is why I did more with the scrapbook pages.
I really like how this card turned out : ) It is simple and sweet and FLAT for easy mailing : ) The "Jingle Bells" is a Rub-On.  And an aside to "plug" Bo Bunny... I LOVE Rub-Ons and buy lots of them but HATE using them and rarely try! so when I tell you these are the BEST Rub-Ons I have ever used! that is a good compliment!!!!! : ) Very clear and easy to use.  You can apply them with only light rubbing to transfer them... LOVE em!

Last but not least is a little bonus that Bo Bunny added to "The Bundle".  There were only two sheets of the polka dot paper (which had the green paper on the reverse) and two of these amazing laser cut and beautifully detailed wreath papers in "The Bundle" - oh, and a pack of glittered embellishments.  There was not much to work with by way of mixing and matching papers but this pretty page made EVEN me! happy!!
The brown bow was added from my stash as was the velum for the photo placement guide.

I hope you've enjoyed these projects as much as I have.  I had the pleasure of seeing Barb display all of these projects in her store yesterday.  I hope they help her sell all of..... "THE BUNDLES" heehee I couldn't resist saying it one more time : )

Please check out THIS POST for all the details and a chance to win a FREE card in my monthly give-away. 

Have a wonderful Saturday!!

Patti

Thursday, January 23, 2014

What can you make for just over $21.00? (Part two)

These posts are kind of long so if you want to see part one of this "mini series" please click here.  

I was hoping to get these pictures to be side by side but I can't seem to get them to fit  so TRY to imagine them as a layout in a scrapbook. LOL These are two 12 x 12" Scrapbook pages : )

From Bo Bunny's Smoochable paper series everything on this page is from "The Bundle" : )  The picture doesn't show it well but I did sew along each of the banners on my regular sewing machine.  The purple bow is temporary.  It was all I had in my stash to match the page but when I get to Barb's store I will replace it with a nice ribbon that she sells. As I do not normally photograph 12 x 12" pages I had some challenges but I hope that you will be able to see the sweet dimensional stickers, glitter brads and chipboard "stickers" that are featured.


The scallop border near the top was created using heart shape Spellbinders die cuts.  I have been using these recently and it is kind of nifty because you get two scallops at a time and they are easily placed.  : )


The next group of pictures is of a scrapbook layout and some cards I created using "Alora" from "The Bundle"  I like this layout much better! I think it might be because I really love this designer paper series.

The flowers on the white space off to each side are all Rub-Ons from "The Bundle".


I placed each element on 12 x 12" pieces of solid white cardstock for this layout.  I wanted a lot of open white space - not too busy looking - but then I felt it needed a little something extra in the white areas so I sprayed a spritz here and there of a light aqua ink watered down a bit with a Stampin Up spritzer - then over top of that I "sprayed" red ink - but the red I applied by rubbing a tooth brush over my ink pad and then just "spraying" the ink. This is a fun technique but oh! did my fingers get inky!! heehee


The dimensional stickers came with an occasional red rhinestone for just the right amount of bling bling


Are you loving "The Bundle"? This is a 6 x 6" card.  The frame is from the Chipboard sheet.  The little bird is a Rub-On and there are three large dimensional stickers attached can you spot them all? : ) The only element on this card that is not from "The Bundle" is the little red ribbon : )


A2 size card


These are all little cards 3.5 x 2.5" that are perfect when you don't need a full size card.


 The little blue bird flying left is a Rub-On the one flying right is a sticker that I made dimensional by popping it up on another sticker : ) The large scallop flower is a sticker that I trimmed to fit. : ) I added a little bling bling on the lower right. I love this bright card! My granddaughter would say it's "happiful" : ) 


 This simple card 6 x 6" was simple to create! The patterned paper was printed with the blue background and the scallops and the polka dots and beautiful flowers.  All I added was the blue square for the sentiment, the ribbon, brads and chipboard birdhouse.  I trimmed around the flowers from the tree branches carefully with an xacto knife so that the blue frame would slip up underneath - easy peasy! And it is all from "The Bundle" except the ribbon and the sentiment.  The sentiment is from a Clear Art stamp set called "Glamour Girls"

I think I am so in love with this paper series because it is so bright and springy.  After weeks on end of sub zero temperatures I needed a little spring! : ) 

If you've made it all the way to the end I applaud you! : )Thank you so much for looking.  Please be sure to take advantage of the FREE card give-away I am offering.  There will be a drawing on February 10th.  Please see THIS POST for details.

Have a wonderful day! and check back tomorrow when I post the projects from the third series of Bo Bunny papers called "Mistletoe"

Patti

Wednesday, January 22, 2014

What can you make for just over $21.00? (Part one)

My good friend, Barb, owns a Scrapbook Store and she recently told me that she has this AMAZING bundle from Bo Bunny that she retails for $21.99.  "The Bundle" holds THREE separate collections from Bo Bunny.
She said that she needed to create some projects using "The Bundle" so that people could get a better idea of the things they could do with the pack.  I asked her if I could give it a whirl! : )  The next couple of posts are projects I made but as you will see it would take me a LONG time!! to use all of this!
I started with the Bo Bunny "Smoochable" series. Which has the sweetest papers - perfect for Valentine and "girly" projects. I'm really not trying to sell this bundle to you but I simply can't believe all that is included.  In the Smoochable series alone there are 2 each of 6 different double sided pieces of 12 x 12" cardstock.  a 12 x 12" piece of colored Chipboard shapes and a 12 x 12" sheet of cardstock stickers.  As well as a package of dimensional stickers and another package of Rub-Ons and a package of some fancy brads PLUS a package of these super fancy broach looking brads (they show us nicely in the top picture).  Anyway! EACH of three different paper series have the same combo of papers, chipboard, stickers and embies.
For the base of my first card I used white cardstock (from my stash) and added the swirly brown border trim on the left of the card from the Rub-Ons.  I embossed the cardstock after the rub-ons were added.  Both Rub-Ons and Washi tape really emboss well by the way : )  I then applied the self adhesive Chipboard hanging hearts and popped up a circle and scallop shape from Spellbinders.  The pattern paper is from "The Bundle".  Neither the embossing folders nor the Spellbinders are included in "The Bundle".

Next I created this card using quite a few of the stickers that were included on the 12 x 12 sticker sheet.

I used a piece of the cardstock from "The Bundle" and then just sort of applied stickers wherever I thought they looked nice.  I inked the card base as well as each sticker with brown ink.  I cut a scallop with Spellbinders dies and left it open like a frame to highlight the heart sticker strip and word sticker strip.  I then added one of those darling little broach like brads.  These brads are VERY light, thin (flat backed) and pretty.  In this case I left the brad part closed and just glued it to the card with a glue dot.

For the next card I wanted to show off some of the sweet Epoxy Brads.
Again, I used some of the cardstock from "The Bundle".  The sentiments were all stickers  from the matching 12 x 12" sticker sheet.  I attached each sticker to cardstock.  The banner is glued flat to the card the other two sentiments are popped up with a foam dot.  I also used two sweet epoxy brads and showed them all off on a plain piece of cardstock that had been run through my Big Shot using the "Spots and Dots" Cuttlebug embossing folder.

Two themes throughout the Smoochable paper series are banners and these little hanging hearts.   I started with a soft creme card stock (not included in "The Bundle") and then added a piece of patterned paper.  I created this little banner using plain cardstock and some alphabet stickers that are included on the 12 x 12" sticker sheet.  I "hung" the heart which is actually a Rub-On cut in three separate pieces.  I rubbed the string on the background paper -  I rubbed the main part of the heart on the solid cardstock (before I ran it through the Big Shot to emboss it) and then the very last section of the hanging heart was applied to the popped up section holding the sentiment.  The whole card is flat except the sentiment section.  I inked the card and all it's components with a soft soft pink ink.

Wanting to show Barb's customers that this great bundle can be used for more than just card making and scrapbook projects - I created this little covered notebook.  Barb has three daughters and I can imagine any one of them carrying it in her backpack! : )

I used the patterned paper from "The Bundle" and the "SWEET" sign that is bordered in brown swirls is a  Rub-On.  The ribbon is from my stash (oh gees! I should have used her ribbon! oopie) and then the chipboard tag and glittered brad were all part of the great products in "The Bundle".

Do you like them so far!? Would it make you want to buy "The Bundle"? It has made me want one for sure!!

OK, now for the scarey part! Naturally as a Scrapbook Store Barb needs to have some of the samples made to be scrapbook pages.  This is where I get really nervous! I have not done very many scrapbooks so I admit to feeling a bit intimidated.  The first layout I did was using the Smoochable papers.  I hate it!  Ok, I guess that is a bit dramatic! but I'm not "proud of it".  I think that is the reason that I failed to photograph it when I was shooting pictures of these cards! LOL stubborn I guess.  heehee Tonight after the sun goes down I will do another photo shoot showing off the next group of projects I have been working on from Bo Bunny's "Alora" paper series.  When I take those pictures I will shoot the scrapbook pages from "Smoochable" too. Good or Bad you can see them here in the next post! : )

Until then Have a great day!! and please stop by THIS POST for a chance to win a card that I will be giving away on February 10th.  See the details for how you can win by clicking the link.

Patti : )

Tuesday, January 21, 2014

hello baby

My sister, Beverly, found this FREE digital image of the baby on-line and suggested we might both create a card using the image.  Here is my card.  I hope she will send me a copy of her card so I can post hers too : ) If you would like to join the fun get your free image HERE and send me a link to your image or send a picture of your card and I will post it here too!

I printed the image approximately 1.5" wide so that it would fit nicely into the Stampin Up Designer Frames Embossing folder and colored it softly with some watercolor pencils.  After embossing the frame around the baby image I scored the face of the white cardstock with diagonal lines 1" apart going in two directions using a Scor-Pal for a quilted blanket look.  I then sewed "french knots" everywhere the lines intersected with white embroidery floss.

I added accent paper that I embossed with a Quarterfoil embossing folder from Paper Studio.  My sentiment is from Stampin Up! Teeny Tiny Wishes set.

Inside I added some of the same embossed papers as well as a Victorian looking pacifier image from The Angel Company.

Thank you for looking!! : ) And please! consider creating a card using this free image too. Once your card is completed simply upload it to your blog and I will post the link from this post to your blog or if you like you can send me your picture file and I will add it to this post.  It would be really fun to see what each crafter comes up with. : )

Patti

p.s. Please be sure to take advantage of the FREE card give away I am offering! See THIS POST for details.


Friday, January 17, 2014

February FREE card Give Away!!


BEVERLY ANN FLAMME IS THIS MONTHS WINNER!! 
CONGRATULATIONS BEVERLY ANN
 **WATCH FOR THE MARCH FREE CARD GIVEAWAY COMING SOON : )

I will be giving away one of these cards (your choice) in a drawing to be held on February 10th! International friends welcome : ) All you must do to have a chance to win is "follow" my blog and leave a comment on this post and you will be entered in the drawing.

My card design was inspired by the MoJo Monday Sketch #328
To see the MoJo Monday Blog click here


I used the same paper for both cards from the Designer Paper Series "Everyday Enchantment" by Stampin Up This card is embellished by a cream colored ribbon and a little key from EK Success.  The hearts were created using Spellbinder's dies. : )

.
This version is more mail box friendly as the embellishment is flat! : ) The little xoxoxo stamp is an old Stampin Up image : )
And finally a glimpse into the inside of just one of the cards.  I do like to make the inside as nice as the outside of the cards I make.

Thanks a bunch for looking and Please leave a comment and "Follow" me for a chance to win one of these SWEET cards! : )

Also Please blurf on over to the MoJo Monday blog for inspiration and leave them some love too!!

Have a great day!

Patti