Sunday, August 31, 2014

Kickin' Booties!


I really love my new bootie die and detail dies from Papertrey Ink. Today I want share a pair I created for my friend, Theresa to celebrate her first grandson.  This is going to be a long(ish) post because I've taken a a bunch of photos in hopes that if my descriptions are lacking you'll be able to pick up what I leave out from the photographs. : )

Here we go...


Remember these? Corsages made from silk flowers and baby socks?  In this part of the world these sweet little corsages are all the rage... or maybe it is just with my husband's family LOL but no baby shower is complete without a baby sock corsage.  Here is a picture of my niece, Sara, and I.  Sara is wearing a corsage that I made for her baby shower in 2011.


We have some more niece baby showers coming up this year so I decided to try making the sweet PTI booties into a corsage.


Theresa's corsage was my "guinea pig" : ) here is how I did it.

After constructing the actual booties from the PTI dies - I stitched the two booties together -


stitching them carefully with an off color thread. These threads will be easy to snip in the event the recipient wants to take the corsage apart to use the booties. : )

Before filling the shoes with flowers I needed to attach the pin backing.  This is a pretty hefty corsage so I wanted to be sure the pin would hold the corsage and again, I wanted to be sure the booties weren't spoiled in the process.


To achieve this I created a card stock piece which would serve as my "platform" for the pin back. I laid the shoes on the piece of cs - drew an outline then cut it out.


I then pierced holes where I wanted to stitch.


Lining the cs "platform" up on the bottom of the shoes I then stitched the cs to the booties using the same thread I used for constructing that part of the booties.  I did not use an off color thread because I knew it would show on the top of the booties.  As long as the recipient snips only the threads visible on the face of the cs platform they won't run any risk of snipping the wrong threads.


Next I made a couple of stitches to secure the pin backing to the cs and the booties and finally added two drops of hot glue to insure the pin  back would not fall off or be flimsy.


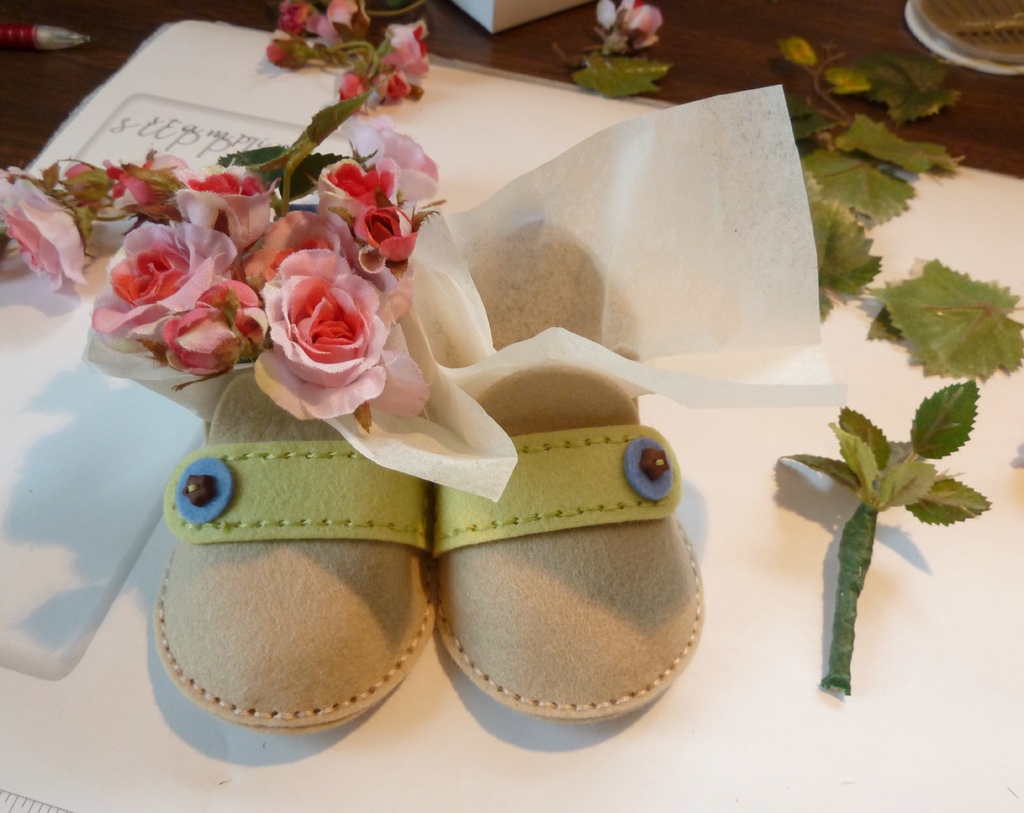
I put some lightweight tissue paper into the toes of the booties for support. This is an important part of making sure your booties can hold the weight of the flowers and leaves.

For this corsage I wanted to use "Grandma Pink" : ) silk roses.  I have been told I may have overdone it on the roses LOL but I guess I should have mentioned first of all I am NOT a florist LOL so I was winging it.


Here I wired my flower clusters to florist sticks (which were way too long but later timed) and then I covered the wire and the sticks with green floral tape.


After trimming the sticks to the length I wanted I was ready to place my flowers.  I wish that I would have had some florist foam or clay so my sticks could have stuck in securely but I didn't have any.  When I do this again this is the only step I would change.  Instead I simply put a layer of tissue paper in the shoe to protect the bootie and then began arranging the floral sticks into the booties adding drops of hot glue as needed to secure them. When I was finished I tucked in any remaining tissue paper that was hanging out - filling in any gaps around the inside of the shoe to be sure the flowers would remain secure.


That's it! : ) neat huh?  I really love making these booties. And I was pleased with how the corsage turned out.  Theresa was too : ) Her grandson, Christopher, was born on August 26th : )

I will be traveling to Florida next week to visit my Dad and I wanted to take some hand sewing with me so that I will have something to do on the plane and in the evenings if I'm alone.  I have cut several different pairs and I'm having to hold myself back from stitching them all up before I go! LOL


I do not plan to make all of these booties into corsages...... but....... then again.... you never know! : )

Thanks a bunch for hanging with me all the way to the end of this post : ) I think it took me longer to explain my process than it actually did to create the corsage LOL


This is my first time for entering Simon Says Stamp challenge! I hope I did everything right : ) What are you waiting for!? It is anything goes this week! so please come on and join the fun!!

Patti

Supplies:
Baby Bootie Die from Papertrey Ink
Baby Bootie Detail Die from PTI
Coffee Cozy Detail Dies from PTI
Felt from PTI
Silk flowers, ribbon and buttons from my stash 

Friday, August 29, 2014

I Miss You


Isn't this image cute!? I have recently "found" Serendipity Stamps and I love them!! : ) Their products are fantastic and the customer service is outstanding!! I definitely recommend checking them out.

I am entering my darling little shoes in this months challenge.  Here is the challenge:

Challenge #34 - Missing You!  Create a "Missing You" themed card.   Be sure to include at least one Serendipity Stamps image (Stamp or Die) on your project! Our favorite design will receive our winner blog badge and one random winner of this challenge will receive a $20 discount off their next order from Serendipity Stamps.

Great prize!  : ) 

I've been busy the past few days and I know I'm a little behind visiting my blog friends.  I hope you are all well and having fun getting inky!  I will be visiting you all very soon.

I hope to be back tomorrow with a LONG post to show you a sweet little project I've been working on. If not tomorrow then Sunday for sure. : )

Have a wonderful day!

Patti


Tuesday, August 26, 2014

hello baby


Something about babies and polka dots - just make me smile! Here is a sweet little pair of booties I CASEd from Nichole Heady of Papertrey Ink.  Nichole's darling color combo sealed the deal when I was making this buying decision : )

I have been in bootie heaven lately but I will share more about that in my post later this week.  Today I want to mainly focus on my card.  I started with a white card base by PTI.  I embossed just the top portion of a slightly smaller card face using the Large Polka Dot embossing folder by SU.  Next I scored four lines using my Scor Pal - creating a little frame for my aqua mist polka dot ribbon by American Crafts. Now it gets really fun!


Is that itty bitty little bow adorable or what!? My first ever purchase from Mamma Elephant - the  Dainty Bow and Hello Script dies! I cut both from Aqua Mist felt by PTI


Because of the three layers of the bow and the resulting thickness I decided to beef up my felt "hello" die cut by cutting two of the same die from my white cs. The added thickness really makes it stand out nicely and I feel the felt adds to the softness of this hello baby card! : )

I tell you - these booties are addicting... and I hope I never recover! Please stop back later this week because  I will show you a baby bootie corsage I created for a special friend  : )

Have a wonderful day!

Patti

Supplies:
Card
White cs by PTI
Large Polka Dot embossing folder by Stampin Up
polka dot ribbon by American Crafts
Aqua Mist felt by PTI
"baby" from Limitless Labels Stamp Set by PTI
Booties
Aqua Mist, Melon berry, Limeade Ice felt by PTI
Flowers and leaves cut from the Just Smile Collection dies
Embroidery floss by DMC


Monday, August 25, 2014

Time After Time

For the final challenge of the 2014 Stamp-A-Faire Nichole has challenged us! Here is what she writes:  Take this opportunity to reflect back on what this hobby has done for you and all the beautiful things you have made with your two hands and your heart!  Dig into your stash and find one of your early creations.  Utilize many of the same elements, colors or even the design to create a new card that embraces your current style.  Enjoy the process and be proud of how far you have come!

I was so surprised as I review the pictures of my early cards how CAS my style was then.  I know it was, in part, due to the lack of supplies I had on hand but I think I've gotten more "chunky" and embellished as I progressed in my card making style.  I may have gotten more chunky in other ways too but we won't talk about that! : p


I do not have any pictures of my very early cards but this one was created and photographed  in 2007.  My card style isn't the only thing that has changed LOL  I used a flat bed scanner to get my pictures.  That is the reason for the warped looking image.

And here is a card I created today. 


I tried to stick with the same basic design of my card today as the one from 2007.   When I first began playing on forums and message boards I used the name "ant me."  : )

One of my favorite card styles to make now is Square cards. A few other changes to my style have been the addition of die cuts which I am crazy for! A strong use of embossing which is on most of my cards (not this one LOL) and one of my favorite stamping additions has been the purchase of papertrey Ink products.  I believe I bought my very first set in 2007.  It was the Limitless Layers stamp set for making the Hershey Nugget wrappers.  I did that once or twice and never really gave PTI another look for many years.  I am happy to say they are now my favorite company and my supply of PTI product is really beginning to grow!

That is it for me  and my walk down my personal memory lane heehee

Have a great evening friends : )

Patti


1980 - Final stop on our time travel journey


Lexi Daly from Papertrey Ink has had me making folded notes all afternoon! LOL It was so much fun trying new and remembering old note folding tricks from my own school days (way before the 1980s) as well as refreshing my memory so that I can share these fun little cuties when my granddaughter visits again!

I have to admit that I struggled! I wish I would have thought to check out Lexi's actual blog before I attempted my folding because she has a very helpful diagram on her blog.  Check it out HERE

Stamp-A-Faire 2014 has been fun.  Not as much fun as if I would have been sitting with gal pals eating junk food and working the challenges together but I had an unexpectedly - free - few days and found Stamp-A-Faire 2014 a great way to spend them! : )


As she guides us to the 1980s Levi writes this:  There was an explosion of color in the 80s and rainbows were everywhere, from clothing and decor to logos, toys, and even postage stamps. Rainbows in their actual form, paired with unicorns and cats, and rainbow patterns, striped and repetitive. Rainbow heart sweaters and shoelaces pop up on almost every 80s search. While rainbows really haven’t ever gone out of style, they definitely had a special place in the 80s.

Lexi demonstrates several sweet projects. Today I created this little gift card holder.


I was in need of a gift card holder for my granddaughter, Katie.  She will be helping my BFF and business partner, Diane, and I with a HUGE outdoor craft fair in October where we will set up and sell our neckStyles™ scarves.   Katie has been my sewing student for many years and has even begun to create neckStyles™ scarves herself - under my close supervision.  This will be her first craft show event and will have the fun of seeing her scarves "flying out the door" at the craft show. : ) She won't want any money for her help but I'm planning to give her a gift card to her favorite fabric store.  This little card will make the perfect holder for her gift!


Stamp-A-Faire closes for everyone by early tomorrow morning but there is just one more challenge we are posed with.  To re-create one of our very first cards.  I just can't wait to blurf around to see all the delightful new and old cards that are created for this leg of the journey.  Please stop back by later to see how I've changed over the years : )

Patti

Supplies:

Solid cs by SU
Thank You sentiment is an unmarked clear stamp which, by the way, is NBUS! 
Flowers and sentiments from the Doodlie-Do stamp set by PTI
"Pull Here" sentiment from the Movers and Shakers Sentiments by PTI

Stamp-A-Faire travel continues to 1960


Erin Lincoln, one of my all time favorite designers, is our guide into the 1960's as the time travel continues (at least for me) Stamp-A-Faire 2014.  See both of Erin's creative video tutorials HERE.

In her second video tutorial Erin writes: 
1960's advertising was all about grabbing your attention with a "big idea". The slogans seemed to talk directly to you, selling both confidence and the product itself. "One doesn't come without the other," they seemed say. 
Naturally, you wanted whatever they were selling in order to feel that confidence boost. Those Mad Men certainly knew how to do their jobs and land those accounts. 
Your challenge is to grab the same sort of attention on your paper crafting project. Combine a sense of order within something asymmetrical. Use bold, clashing colors and overlapping shapes with confidence. The type was thick, whimsical, and black and often placed on the lower half of the ad. Inlaid die cuts help to add a slick and sleek appearance.

That was the inspiration for my card this morning. This is a card for one of my sisters who is facing a terrible health struggle.  I want to SELL her on taking it easy and letting God take control of her - from head to toe!


I started with a white card base by PTI.  I cut a rectangle Spellbinders die from a piece of solid Island Indigo cs as well as the same rectangle from a Real Red cs both by SU.  I used the negative and positive of both of these die cuts.  After taping my blue and red cs together I proceeded to cut the easy chair and TV/antenna replacing them with a contrasting colored die that I stamped in the coordinating color ink. Next I added some background stamps, sentiment and finally some silver Stickles to bring a little punch to my message. : )

This was probably the most challenging challenge for me so far.  If you are following my journey through time you may find that hard to believe LOL but I didn't feel like I succeeded very well due to the lack of good 1960's supplies for this one.  I like my card and I know my sister will too but when I have more time I plan to try my hand at this challenge again to see if I can do better : )

Lexi Daly is up next with 1980 : ) our travels are getting close to being done.  I'm really looking forward to what Lexi has to share!

Patti

Supplies:
Solid cs by PTI and SU
TV Chair stamp set and dies by PTI called Polka Dot Parade #3
Background stamps from CTMH called Serendipity
Silver Stickles
Rectangle Spellbinders Die

Sunday, August 24, 2014

Stamp-A-Faire - the 1940's


The uber talented Betsy Veldman has created the most adorable post and video for this Era.  Nichole writes on her blog that Betsy sets the tone for the 1940's era with a beautifully composed letter she wrote "as if a young woman were writing to her true love overseas during the war"  Check out Betsy's sweet letter and video tutorial HERE.

Betsy introduced her video this way: During wartime, supplies were scarce and the essentials were rationed.  This meant that new clothes were hard to come by.  So women would “make-do” and spruce up an old dress or hat by creating a flower pin or brooch out of scraps of felt and fabric.  It was their way of breathing new life into a tired, old outfit. 


Here is my little felt nosegay.  I decided to attach mine to a card (which is going to have to be hand delivered with lots of love! ) I really enjoyed creating these sweet little flowers.  Thank you, Betsy for a very inspiring look at the 1940's.

It is getting very late so I guess I will hit the hay.  I plan to be back in the time machine tomorrow hoping to see what the 1960's hold : )

Patti

Supplies:
Solid white cs by PTI
Embossing folder by Anna Griffin for Cuttlebug
Pti Felt used: Raspberry Fizz, Melon Berry, Harvest Gold, Spring Moss
Flowers and leaves cut from PTI's  Just Smile Die Collection
sentiment from Phrase Play #6 stamp set by PTI
Polka dot Ribbon by American Crafts


Stamp-A-Faire - the 1920's

Heather Nichols of Papertrey Ink serves as our tour guide on the next leg of the Stamp-A-Faire journey.  She takes us to the 1920's and inspires us to create some of the glitz that was popular in the Era.  You can see Heather's video HERE.


Heather writes: I am so excited to show you how to create your own rhinestone embellishment that was a popular must have accessory in the 1920's on jewelry, on clothing, and worn in the hair. Using a die I specially designed that is based off of a vintage 1920's jewelry piece, I will show you how easy it is to replicate the stunning rhinestone designs of the era. Gather your rhinestones, the more the merrier, to create some true Roaring 20's glitz and glamour.


I did not purchase the Stamp-A-Faire kit so I was not lucky enough to be able to make the same embellishment as Heather did but I did find a sweet little PTI die I could use.  I created this card using an element from the Baby Bootie Detail Die collection.  I cut my embellishment from acetate and applied pink rhinestones and pearls to the cut out in the pre-cut holes in the die.

This was a really fun challenge.  It openes a huge range of possibilities for creating embellishments and it makes me realize... I need more bling! ; )

My card base is cream cs by PTI.  Both pattern papers are from CTMH.  The Wishing you... sentiment is from PTI's Movers & Shakers Sentiments and the Happiest of Birthdays comes from the Birthday Classics: July stamp set.  Ribbon is by Offray.

Next stop... the 1940's : ) I hope you'll come see what Betsy Veldman has inspired.

Patti

Stamp-A-Faire The Regency Era


I had thought of Stamp-A-Faire 2014 as a one day event but I have learned that it really is more of a weekend event.  I am excited about that because I clearly needed more time for my travel through time : )

Melissa Phillips has presented a lovely challenge video HERE.  If you like The Recency Era you are sure to enjoy Melissa's blog and card style.  Here is what Melissa writes:


The Regency Era is such a romantic era to gather inspiration from.  In the early 1820’s you would have found lovely, ornate, gold fixtures and decor in the homes.  Intricate, flowing penmanship - something that seems time has lost between that era and this generation, but is definitely a cherished trademark of that time.  Needlepoint ranging from scarves, head coverings, gloves, to stockings, and then on into the home for added elements of beauty and comfort.  The power of the written word, as we well know from Jane Austen, was flowing and an essential part of life.  The “flowering of the arts”, has been used as a definition for this time period in reference to paintings and poetry.  It seems that everything was ornate and embellished, whether it was the clothing worn by the men and women, or the decor found inside the homes, “flamboyant” is a word that has been used to define this wonderful era.


I wanted to focus on the needlepoint portion of Melissa's challenge so I added cross stitching to my card. Before I show how I did it let me build the card so you'll have a better chance of following my process : )

I started with a cream cs by PTI.  I  selected a soft sage cs (unknown company). I "debossed" the sage cs with a Anna Griffin 5 x 7" die called "Flower Bramble".  Next I cut another piece of cream cs and a matching piece of vellum.  I stamped a cluster of roses from PTI's Life is Sweet stamp set in a soft brown ink on the cream cs. I layered the vellum on top of the cream cs and then I was ready to add my cross stitch. 

I found a stitching "font" I wanted to use and then I created a little pattern for it on 8.5 squares per inch grid paper.  Next I layered my pattern carefully over my card stock and vellum overlay and placed it on a piece of Styrofoam.  Using a piercing tool I made tiny holes where they would normally be on Aida cloth for ease when I was doing the actual sewing.


I really enjoy needle work like this : ) and I loved how it turned out.

The rest of the card came together in a snap.  You will notice I finally got to add some polka dots LOL as well as a snippet of a beautiful cream leafy trim from my LSS (which is  NBUS) : )

That's it for the Regency Era for me! now I'm off to the Roaring 20's with Heather Nichols.  I hope you'll stop back to see what I've got in store for you next! : )

Patti

Saturday, August 23, 2014

Stamp-A-Faire - The Renaissance


Sometimes travel comes with problems and I've had my share today! Computer troubles have kept me more than a little frustrated and way behind schedule.  Ahhhhh! breathe! : )

Have you ever dreamed that Nichole Heady would show up at your door asking you to join her design team because your cards are so great?  I love that never-wanna-wake-up-from dream : )....... just kidding I've never dreamt that but if Nichole stopped by this post I'd be embarrassed! ugh.  I could go on and on about the troubles I had and how I almost burned the house down! (terribly close to serious on this one) and I could explain how the dog amost ate my homework but then she'd figure out that I don't even have a dog and there is no excuse for this poor take on her beautiful challenge and I'd have to hang my head! LOL  What can I say we are working with the Renaissance here - lots of drama and all.

OK Enough! excuses and dilly dallying I need to get moving because Jane and the Regency era are waiting to be introduced!


Nichole's amazing video tutorial is HERE Please be sure to see this one for yourself : )


I based my card on her two lovely demonstrations.  I do not have any velvet in the house so I attempted to create a medallion focal point - what I'll call a faux velvet : )  I created this by selecting a patterned paper and stamping a medallion on it.  I then heat embossed it using clear embossing powder.  It kind of looks like embossed velvet to me anyway.... hmmmm. After the paper cooled I swiped Gothic Purple Staz On ink over the top to add dimension and to help bring the medallion out better.


Nichole writes:  During the  Era, wax seals were an important part of correspondence.  Men and women alike usually wore a custom designed ring that featured their monogram or family crest.  Whenever they wrote an important document or letter, hot wax was added and the ring design impressed into to it.  Not only was this an important element of security and honor, it was also a stunningly beautiful tradition that we unfortunately no longer do today!

I had printed out the supply list for today's festivities and tried to purchase the things I needed for each challenge.  Some supplies I was able to come by - some I was not.  One thing I did not need to buy was sealing wax because I knew I had some in my craft drawer.  The sealing was I own has been in that craft drawer since... I think it's actually been since about the Renaissance Era! or some time in the 1970's - literally LOL.  And it was gold! so yeah one supply I didn't have to buy : )  Here is where the fire department got involved (just kidding).


I fired up the wick and horrible black smoke began to fill my craft room.  I didn't blow it out.  Eventually BLACK and gold drops of wax fell onto my tin foil but not fast enough for me because the flame, which was now about 3 inches high was not only spitting out thick black (probably toxic) smoke but also teeny tiny bits of soot! Oh gees!! but as soon as I had a big enough pool of wax I inked up a small stamp from my Doodlie-Do PTI stamp set in Versamark and squished it into the wax.    ...... um..... uh...it didn't work and I quite possibly ruined my stamp : (

Ok,so what would you do?... no really? ... ok yeah, but what if Nichole were coming?  I fired up that sealing wax stick again and waited for my poor husband to come running in to rescue me with the fire department. Which he never did, by the way!LOL I tried the process again and this time I squished this little gold seal into the hot wax and walla!


Perfect right!? ok, so it has a tea kettle instead of a coat of arms but what can I say?! LOL Shamelessly I peeled it from my tin foil and attached a TEA KETTLE! it to my card.  Oh but before I did that I added a snippet of black and gold ric rac for some real regal elegance (it's ok, you can roll your eyes I will understand).

By now I'm starving because I skipped lunch and it is after 4 p.m. I have guests coming for dinner and the house still smells like... icky black sooty gold sealing wax.  My husband has been able to get my computer running but girls, no telling how long this beast will survive!  If it lives I will dust off the soot from my craft table and move on to the Regency Era : ) thankfully a bit more up my alley.

I hope you are having a great time with Stamp-A-Faire 2014.  As soon as humanly possible! I will be out to visit your blogs and see all the wonderful things you've created : )

Patti

Supplies:
Solid cs by SU
Patterned papers by CTMH
Die cut from Spellbinders
Medallion Stamp ( a NBUS) from Lil Davis Designs
Sentiment is a masked version of the large stamp from PTI's Birthday Classics: May stamp set that I stamped in Versamark and embossed with  gold embossing powder

A visit to Ancient Rome! with PTI


Today is Stamp-A-Faire at Papertrey Ink.  For this long awaited event we will be traveling through time to many different eras stopping to learn about the art of the time as well as the music!

Lizzie Jones presented two wonderful video tutorials HERE - sharing techniques to replicate the art of Ancient Rome.  My card this morning is my take on her challenge.


I was unable to get any Embossing Paste in time for this event so I decided to create my own faux mosiac background simply by cutting up paper shapes and gluing them to my card base.  I selected a pp from CTMH and roughly cut mosiac shapes, adhered them to my cs and "antiqued" them using a sponge and ink.  I stamped a leaf design randomly all over the background using Limitless Layers Stamp Set by  PTI. 

Next I took a solid gray piece of cs and trimmed and cut out a window opening. I antiqued it a little using a sponge and gray ink.  I then stamped the same leaf design from Limitless Layers on the bottom of this section using gray ink.  I layered a rough "mosaic" portion of the pp and layered it behind my solid cs.  I popped this portion up with foam tape.

I cut a strip for my sentiment and again stamped my leaf design from Limitless Layers Stamp Set and finally stamped my sentiment over the top in green ink from Dawn's Boutique Borders: Friends PTI Stamp Set.

This card is SO not me! LOL but that is the fun of participating in an event like this.  We get to try new techniques and styles : ) Because of Lizzie's inspirational videos I WILL be trying the embossing paste! just as soon as I can get my hands on some.

I have to admit I'll be excited when we get to the "Polka Dot Era" : )...... is there such a thing?? LOL

I'll be back in a little while with the next leg of my journey today with Papertrey Ink's Stamp-A-Faire"  Please consider joining the fun!! There are prizes - woo hoo!!

Patti

Supplies:

Solid cs by SU
Patterned paper by CTMH
Window die from Spellbinders
leaf die stamp from Limitless Layers Stamp Set by PTI
Sentiment from the Boutique Borders: Friends Stamp Set by PTI

Friday, August 22, 2014

Stamp-a-faire 2014 tomorrow!!


I've tried to clear my calendar so I can join some of the fun from here in northwestern Wisconsin!!

Be sure to check out the Papertre Ink blog all day tomorrow and stop over to see me too!

Patti

Just wanted you to know...

Before I begin my post today I would like to extend a super warm welcome!! to my newest follower, Vicki from Stamp Smiles blog.  She is a kind and talented paper crafter.  I hope you will pop over to visit and leave her some love! Thanks a bunch Vicki  - I hope you'll visit often : )

Inside reads: "You are in my prayers"


I'm afraid you will miss it if I don't point it out but I have clouds and a moon! in the sky of my card.  This is the second day I've tried to photograph this card  (rather unseccussfully).  If I darken the photo enough for you to see the details in the sky the whole thing looks dirty.  So take my word for it - it's nice : ) LOL 

I learned how to create the moon from my clever! blog friend, Carole Z, owner of Carole's Crafty Creations blog in THIS POST.  It's a  very easy way to achieve a moon : ) Thank you Carole for the brilliant tip!.

I stamped the trees with Crumb Cake ink by SU and then applied both blue and a soft pink to the sky and ground using Pebbles Pastel chalk. Then I stamped the sentiment in the same, Crumb Cake color ink.

Anyone have fun plans for the weekend? I have had such a fun week I may have to stop and finally clean the house! LOL

Have a great day. : )

Patti

Supplies:
White cs by PTI
Pink cs by SU
Lovely as a Tree stamp set by SU
Chalk by Pebbles
Sentiment by CTMH - Card Chatter - Sympathy
White satin ribbon and bow from my stash


Thursday, August 21, 2014

This is exactly how it is supposed to work!


One of my favorite enablers, Marybeth Lopez  posted THIS amazing card! which "forced" me to go shopping! Where I found THIS sensational company! : ) I spoke with Mary,  the owner of Serendipity Stamps on the telephone a couple of times and Friday she is coming over for lunch! Ok, kidding about the lunch but I feel like I've made a new friend : ) Don't you just LOVE blogland! : )
Thank you Marybeth for all your stunning card creations and thank you, Mary, for your outstanding product and customer service! 

This card makes me happy I hope you like it too.  I started with PTI white cs.  I "debossed" the front of the card with the "Hearts" Cover Plate.  I secured a piece of Birthday ribbon by Offray and stamped "birthday wishes" to the smooth section. 
I CASED the idea  to cut several layers of the Happy die from some unknown but brilliant person in blogland who started the "craze".  I have no idea who it was that came up with this idea but I think they deserve noble prize or something for the fantastic idea! Darnell can you head up the committee for this?
A super simple and totally sweet birthday card for a very sweet friend of mine!
I hope you are enjoying your day and making someone happy!
Patti
Supplies:
Happy die by serendipity Stamps
PTI white cs
PTI Hearts Cover Plate 
Birthday Wishes sentiment from PTI's Phrase Play #6 stamp set
Birthday ribbon by Offray - I am not sure where I purchased it.