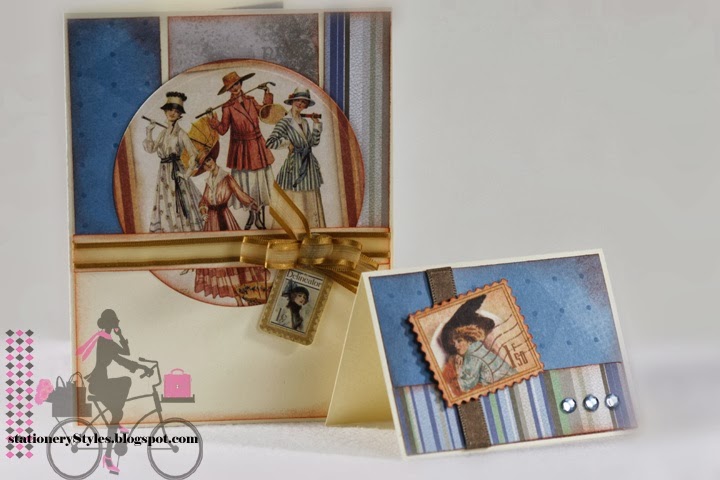
Here is a Thanksgiving card that Diane and I created for some VIP neckStyles™ customers : )
I have accidentally thrown away the strip of paper that gives the company name of the patterned paper. If you are interested please let me know because I can get it. : )
We used a Stampin Up punch for the corners and the image is SU as well.
We actually sewed the card on the sewing machine - without thread - for the paper piercing but did pierce the corners by hand.
Thank you for looking!
Patti
Wednesday, December 4, 2013
Saturday, November 30, 2013
Keeping the home fires burning
Hello friends : ) I hope you all enjoyed a wonderful Thanksgiving. I also hope you enjoyed a safe Black Friday shopping spree - if you took advantage of that. I have never (ever) gone shopping on Black Friday. I'm more a stay at home keep the leftovers warm for the shoppers kind of gal : ) One time (only once) Diane and I did a neckStyles™ show at a mall on black Friday. While we normally enjoy great success at shows where people can see, feel and try on our scarves that year we were really disappointed! We quickly learned that Black Friday is for the "Big Box" stores offering large screen TVs and Lap tops for pennies on the dollar! heehee we could not compete with the frenzy and thankfully we decided not to try.
Instead, this year I stayed snuggled up under a quilt chatting with my friends and family on Black Friday - enjoying the sunshine like a cat in a window LOL
These two cards were "hand quilted" by me : ) Two very different paper selections to make for two very different looking quilts. I want to apologize for the terrible pictures! my lighting was off and no amount of Photoshop seems to have helped.
These cards are super easy to create! simply cut or punch out squares, cut them on the diagonal - or leave them whole - like I did the 4 corners of the card in the top picture. I like to create "boxes of four completed squares and then run them through an embossing folder for an added quilt like texture. After each of my four (four square sections) are completed and embossed I tape them to the layer and then tape that whole piece to the card. Both cards have been embossed the same way. The bottom card has a more of a pronounced pinwheel in the center - standing out better than the one in the top picture because of the papers I selected.
You can make your quilt simple or very intricate depending on the size squares you choose to use.
Please feel free to print out and copy this simple quilt design. If you post your card please send me a link I would LOVE to see it!!
Have a wonderful day.
Patti
Wednesday, November 27, 2013
Monday, November 25, 2013
Excitement is in the air!!
It is a tremendously exciting and busy time for Diane and I in our perspective "neckStyles™ factories" : ) Our sewing rooms and even our living rooms, sometimes, begin to bulge with all the scarves we've sewn in preparation for the Christmas Shopping season.
We have completed all of the craft shows for the year that we will participate in and so for the next month (plus) we will be putting all of our focus on our Etsy shop and caring for our on-line customers.
We have a some BIG releases of all new scarves coming out this week and next week along with a super duper sale!! Starting tomorrow it's our "Buy Three Get One FREE!!" sale - all of our customers seem to really love it when we offer this sale. : )
Today I will be putting the finishing touches on a special gift that we will be including with each order. We always put a special treat in each box we ship but for the holidays we will be changing it up a bit : ) I will tell you it involves paper! LOL and as soon as I can I will shoot some pictures and post them. These new thank you treats will begin going in boxes tomorrow!
Today I am posting this sweet - simple little card that sums up the outstanding! friend and business partner I have in Diane. I made this card for her. She truly is a one of a kind friend.
Have a wonderful day!!
Patti
We have completed all of the craft shows for the year that we will participate in and so for the next month (plus) we will be putting all of our focus on our Etsy shop and caring for our on-line customers.
We have a some BIG releases of all new scarves coming out this week and next week along with a super duper sale!! Starting tomorrow it's our "Buy Three Get One FREE!!" sale - all of our customers seem to really love it when we offer this sale. : )
Today I will be putting the finishing touches on a special gift that we will be including with each order. We always put a special treat in each box we ship but for the holidays we will be changing it up a bit : ) I will tell you it involves paper! LOL and as soon as I can I will shoot some pictures and post them. These new thank you treats will begin going in boxes tomorrow!
Today I am posting this sweet - simple little card that sums up the outstanding! friend and business partner I have in Diane. I made this card for her. She truly is a one of a kind friend.
Have a wonderful day!!
Patti
Thursday, November 21, 2013
It's a wrap!
Shaped cards are among my favorite cards to
create. This card was created using Spellbinders die cuts. The largest scallop
in the set is 4.25" and fits nicely in a 5" square envie. The patterned paper
layers on the top of the scallop using coordinating Spellbinders
circles - LOVE Nestabilities!.
Then I also used a circle for the card backing - scoring it just an
inch or so down so that it opens nicely. If you like you can trim off the
bottom of the scallop so your card doesn't roll off the table heehee or use a
little easel like I do.
This is a smallish card so I used a small sentiment on
the inside. I selected a clear stamp from Close to My Heart which enabled me to
slightly bend the sentiment around the shape of the card.
I wanted the images of the ladies to appear to be a ribbon so I cut the paper strips to look like a ribbon and sewed them to the card. The only way the "ribbons" are attached are with the stitching so the papers lift up slightly - adding dimension. I also sewed on a little purse for one of the gals : )
These cards, like the others in this series, were created almost entirely with papers from Graphics 45 "A Ladies' Diary" collection.
So this wraps up this gift series! get it? wraps
up?? Ok maybe I need a nap.
Have a wonderful day and thank you for stopping
by!
Patti
Tuesday, November 19, 2013
Chipboard Buttons
This card A2 size card is probably my favorite of the cards I've posted in this gift box series. I like the design and colors. My favorite components are the chipboard buttons I used from my stash. I don't think I will ever really USE all the treasures in my stash and the main reason is that once I use them they'll be GONE! LOL I know, sick huh?
These chipboard buttons are from Making Memories. They are cut from paper but then a resin of sorts was applied to the top to give them more dimension.
As I often do - I created this card with a way for my sister to select the sentiments that she wanted to use when she decided who to give this card to. My sister is an avid papercrafter so I included blank papers ready to be stamped by her this time. The papers are meant to slip up under the tab as pictured here:
Thank you for stopping by : ) Have a great day!!
Patti
Monday, November 18, 2013
Happy Monday!
Few more cards that went in my sister's gift box : )
Have a wonderful day!
Thank you for stopping by.
Patti
Have a wonderful day!
Thank you for stopping by.
Patti
Sunday, November 17, 2013
Very Vintage Gift Box series
Hello friends : ) Happy Sunday. I hope that it is sunny in your world. We are under VERY cloudy skies today! Looks like a great day for homemade soup!! yummmm
Here is another set of cards that I created to go in my sister's gift box. I really love this guy! He just wants to be somewhere
else! LOL like perhaps out hunting as it appears that he is holding a rifle bag
in his hand.
I created this as an anniversary card in the gift
I've been highlighting here for the last several posts. Both the 6 x 6" and 3.5
x 2.5" gift enclosure card were created using the Graphic 45 paper. The clock
and the small image were actually stickers. I like to take stickers and
"un-stick" them by putting powder on the back. That way I can layer or pop them
up with a foam dot to give them added dimension. I even "popped" up a sticker
on the inside of the card,
Have a wonderful sun shiny day - even if it is only in your heart!!
Patti
Friday, November 15, 2013
Vintage Gift series
Here are more images from the gift I created for my sister's 60th birthday!! Being a significant birthday and being that I am her YOUNGER sister *wink* I wanted to tease her about "becoming vintage"!
I found this beautiful box at a local store and knew it was perfect for filling with cards! The card shown in the top picture is a 6 x 6" card so you can see it fits well with room to spare.
The box was filled cards including 6 x 6" cards, 5.5 x 4.25" cards and 3.5 x 2.5" gift cards. All with papers matching the Graphic 45 Vintage collection named "A Ladies' Diary" collection.
Here are two more cards that were included. I often create my cards with multiple sentiments so the the recipient can select the appropriate sentiment for their needs. This card came with three layered sentiments ready to attach to the card.
Have a great day!!
Thank you for stopping by.
Patti
Thursday, November 14, 2013
Vintage Birthday
This card is one in a series I made using Graphic
45 papers. I really love using coordinating papers to create my cards because
so much of the work is done for you!
A friend of mine is an avid quilter so she often
gives me fabric scraps. I used one of those fabric scraps on my card in place
of a ribbon. I stitched a zig zag on my sewing machine. I then gathered the
fabric just a little before attaching it to my card.
I used Spellbinders for the circles and pretty
scallop frame and a Martha Stewart border punch. I antiqued the entire card -
including the ribbon - to stay within my theme for this gift set.
I'm off to my sewing machine today! working on some
more new scarves for our shop. I hope you have a wonderful day!! Thanks for
stopping by.
Patti
Thursday, November 7, 2013
Very Vintage gift series
This is a card I created for my sister's birthday. This is one of several cards I created using Graphic 45 papers. This card is approximately 4 x 9.25". I wanted to use the entire image so I had to carefully cut out part of her umbrella - the umbrella folds to fit in the envie. This was a fun gift to create because the actual gift was eight cards plus 8 gift card enclosures (all from the same Graphic 45 series papers) packaged in a sweet vintage box. I will post the rest of the pictures at a later time.
Patti
Thursday, June 28, 2012
Not a calendar!
Funny, I have been reviewing my old posts and find I mostly post calendar pages in the last couple of years LOL Most of them! have never been completed (Oh my) at least I never posted the pictures of them.
Well this year's calendar is different!! I actually HAVE finished it and I am going to post all the pictures from August to December soon. The reason I stopped is that I actually decided to create a similar calendar for 2013 for two of my sisters for their with BIG birthdays this year and I have not wanted them to see the end results until they get their gifts. I will be delivering one to Beverly in Indiana in July and the other to Susan who will be meeting us in South Dakota in August!! yahooee!! so after that I will post them I promise!!
While you wait with patient excitement heeheehee here is a sweet "ONE-OF-A-KIND" card I created a while ago. I love how it turned out! I love the recipient!!
Hope you are having a wonderful summer.
(((Hugs)))
Patti
Wednesday, January 11, 2012
January - July Calendar Pages
I was clearing out my file cabinet and found this Stampin Up calendar that I ordered some years ago and never used. I
really like the 6x6 size of the pages. I decided this would be a "quick" project
to begin and complete in the month of January. There is enough space to have
fun creating while not so big a "pallet" as the 12
x 12" calendars I've done in the past.
I had just completed a Christmas card for my neighbor, Mrs. Dodge, and decided that I would pattern each month's layout after a card I had previously made or enjoyed. I felt this would also help with keeping this project "quick" meaning I would not have to invent a new design for each layout. So my January layout was born in a matter of minutes! using products almost exclusively from Close To My Heart.
The following six posts are what I've completed so far through July. Some layouts are new and some are indeed patterned after a favorite card I've made before but so far each one has been FUN!
I will post the rest of my calendar pages when they are completed!
Happy New Year!!
me.
February Calendar
January is the most popular month for starting a
diet!
I guess some of us need to shed those extra pounds
from all those pounds of fudge and Christmas cookies we were tempted by! : )
I
found this darling little image and sentiment from the people at "indadinkado"
who bring us $1.00 Clear Stamps. I really love the $1.00 stamps. They are
normally pretty good quality and there is something so "right" about a deal like
that. This one in particular really makes me giggle! I have used it many times
and enjoy a "ah~ha! I can relate" each time I see it.
In case you can't see the sentiment in my photograph it says:
I've been dieting for the past month.
All I've lost is 31 days!
I cut the word February from my Cricut "Designer's Calendar" cartridge.
I'm happy you can't see the numbers that I stamped on the calendar portion of my layout because I really flubbed up! : ( I have tried to conceal my booboos but the numbers I stamped did not turn out very well. Happily this calendar is for me and I plan to enjoy it no matter what! I hope you'll enjoy it too!!
Patti
March Calendar page
I patterned this layout after a
card I once made. I
recently gave the card I created away and decided I would make my March layout
using a similar design so I would not forget it!
My papers are "old" Stampin Up
papers.
I used the "Ginger" font from Quickutz to cut the word April.
And I used a
truly SWEET! image and sentiment from my friends at Peachy Keen Stamps.
Thanks a bunch for looking!
me.
April Showers
Actually in Wisconsin I've noticed it is more like
May Showers bring June flowers but in 2012 I'm hoping for early showers and
early flowers : )
This layout was created using sweet papers from
"Autumn Leaves" . I accented the boots by cutting a second matching boot and
attaching it over the first boot using a pop dot in all four locations.
I wanted it to appear that the rain comes and
brings the little flowers on the bottom left. Clever for an old gal! LOL
I have a plaque in my flower garden outside. It says:
"Who plants a seed beneath the sod and waits to see believes in God."
I do, believe in God, and know that no matter how
cloudy it is the sun will shine again!
Patti
Tuesday, January 10, 2012
Some of my favorite peeps were born in May!
For this layout I decided to make a quilt! I
learned this technique from Jennifer in a card swap this fall. It is a very
simple technique - MUCH simpler!! than constructing a fabric quilt : ) I made
this quilt in honor of my sister, Beverly : )
One thing I did not plan well with my quilt was the
size of my quilt squares in regard to the size of the "Huggy Bella" image I
wanted to use! Under the cute hugging friends is a lime green pinwheel! The
pinwheel is a wonderful addition to the quilt but all that can be seen is the
top right corner of the pinwheel. Next time I would leave the pinwheel design
off or else use a smaller image. I considered peeling the green point of the
pinwheel off but realized it would spoil the card so I decided to leave it
alone.
I embossed the entire quilt with a Cuddlebug
Folder, " Houndstooth". I also embossed the paper strip under the word May with
the same folder. I loved how Jennifer selected this folder because it makes the
quilt look... well, "quilted"!! Brilliant idea : )
I computer generated the sentiment from one I read
on-line.
"Friends are like quilts - stitched together one
piece at a time"
I hope you are enjoying my calendar as much as I
am!
me.
C is for Celebrate
June is one of my favorite months! : ) It's the
month of my birthday!! I selected some old Doodlebug papers from my stash. I
really love black and white and hot pink together! I created the silhouette
girl that resembles what I looked like about FORTY! years ago (oh my) from the
Forever Young Cricut Cartridge. I intended to highlight only the left side of
my calendar with rhinestones but under that big pink rhinestone where the number
28 is supposed to be is a number 29! oops so what "they" say is
true:
"There are no mistakes in papercrafting... only opportunities."
I decided to scatter some bling bling around the calendar portion of the layout as well.
I cut the word "June" using my old pal! Quickutz! it is the Marisa font.
"C is for Celebrate" is an old TAC image. It is old yet I believe this is the very first time I have used it! ....so many stamps .... so little time! : )
Patti
Saturday, January 7, 2012
Mojo Monday Design
After one crazy! year I have taken January "off" from sewing scarves for my neckStyles™ business! That means plenty of papercrafting time!! I am working on a nifty calendar for 2012.
While hard at work I popped over to the amazing greats at Mojo Monday for some inspiration and found this design for my September page.
Stay tuned for more pictures of my calendar this week!!
mmmmmm! it's good to be papercrafting! : )
Patti
Subscribe to:
Posts (Atom)